Specify and rename the report columns
Report
type: Template-based reports only
Use the options on the Select
Columns tab to specify the fields you want to include in your report
and arrange them in the desired order.
You can rename the report columns if you wish, using
the fields on the Output Options
tab. For example, you may want to change some of the column names to match
the terminology used in your company or simply to shorten the column names
in your report output. In addition, some field names shown on the Select Columns tab do not match
the labels used elsewhere in PaymentNet for the same data, so you may
want to change the column names in your report for consistency.
If you plan to filter data
based on values in specific fields, you must include those fields
as report columns.
In a template-based report,
you must include Hierarchy ID as a column if you plan to filter on
it. (In a standard report, Hierarchy ID is automatically available
for filtering.)
Removing a column from the
report will also remove any filters based on that field, as well as
any sorts, groups, and calculations.
On the Select
Columns tab, select a module from the Filter
Data Fields by Category list to see the available fields in
that module. Custom fields will be shown alphabetically, by the user-defined
name.
Enter a word or phrase
in the Select Data Fields
box to list only the fields with the search text in their name.
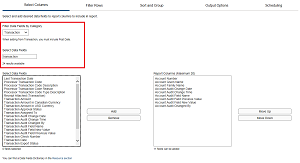
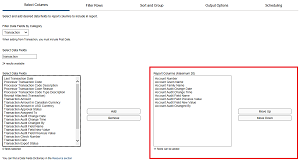
Add fields to your report,
up to a maximum of 20 columns, or remove fields you don’t need. To
add columns, select one or more fields in the Select
Data Fields list and click Add.
To remove columns, select one or more fields in the Report
Columns list and click Remove.
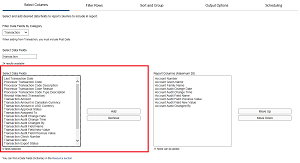
Columns display in the
report output in the order they appear in the Report
Columns list. To change the column order, select a field and
click Move Up or Move
Down to move it to the desired location. Repeat this step as
needed until the column list is arranged as you want.
On the Output
Options tab, go to the Column
Data settings.

Click Add
Column Data.
Select a column in the
Report Columns list and enter
a new label in the Rename Column
box.
To rename another field,
click Add and repeat the
previous step. To remove a label and restore the original name, click
Delete.
Data Fields Dictionary:
This document is available on the Resources page and defines all of
the fields that can be included in a report.
PDF reports: If you
are creating a report for PDF output, you may want to limit the number
of columns to improve readability.
Multiple modules: You
can combine data from multiple modules in one report. If you do, your
report will only include records that contain data in each of the
included fields. For example, if you specify Account Number (from
the Account module) and Transaction ID (from the Transaction module),
your report will only include accounts that have posted transactions.
Chart of Accounts:
You can replace the generic names for Chart of Accounts Segment values
with your organization’s specific Segment labels. For example, suppose
a Chart of Accounts includes segments for GL, Cost Center, and Purchase
Order. If a report includes columns for COA Segment Value 1, COA Segment
Value 2, and COA Segment Value 3, you could rename them using the
actual segment values (GL, Cost Center, and Purchase Order).